This article will be your guide for taking a test with your Heru device.
Before beginning the test, please confirm that you have successfully completed the Heru Portal registration and HMD Light-Shield/Lens Holder installation.
- Ensure that the battery of the HMDs is charged to at least 50%. Refer to the HMD instructions of use for charging instructions.
- If the patient has a distance prescription, please use the trial lens holder. Be sure to use spherical equivalent for each eye being tested.
- Turn on the HMD device as well as the controller, and once you've arrived to the main menu, launch the Heru re:Vive app.
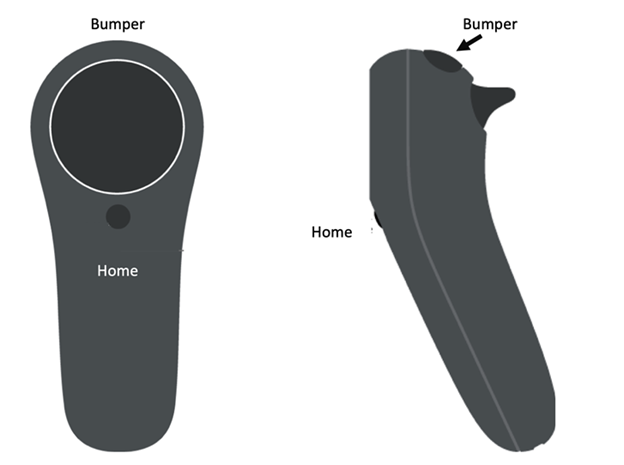
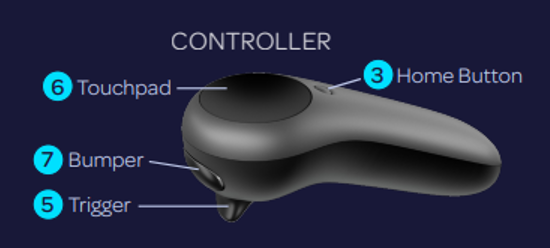
- Setup the appointment information in the portal, and explain to the patient they need to keep their head straight and not move it while the exam is being administered. The bumper (indicated in the below image) will be the only button needed to run the re:Vive app.
- Place the device on the patient’s head. The HMD can expand to fit most heads, but generally, the patient will want to keep the back padding high on the back of their head. Make sure it is comfortably positioned. Ensure the device is secured onto the patient’s head to prevent it from sliding down during testing.
- The patient will see a screen with four corners.
- Alignment step:
⦿ If the patient can see the four corners, then the device is positioned correctly. Remind the patient to keep their head position straight. Confirm in order to insure that the patient's view is unobstructed during testing.
⦿ If the patient cannot see the four corners, have them adjust the device on their head until all four corners are visible.
⦿ The patient will let the technician know that they are ready to start the exam. The technician can then proceed to select the device, and start the exam from the portal.-png-1.png)
- When the exam starts, the Heru Guide will give them the following instructions:
⦿ Fixate your eyes on the bright white dot that will appear in the center and follow this white fixation target wherever it moves.
⦿ There will be flashes of light in your peripheral vision. Do not move your eyes to look at the flashes.
⦿ Click the bumper whenever you see a flash. The brightness of the flashes will vary during the test. - A bright white dot will appear in the middle of the screen and the test will progress automatically.
- During the test, the health care provider will be able to see the progress of the test on a
progress bar on the Exam View, including what points on the test patter have been tested, have not been tested, need to be retested, were not seen, and seen. There is also a progress bar in the Exam View. - While testing, if a patient loses track of the fixation point in any area of the screen:
⦿ Stimuli will stop showing and the Heru Guide will return to encourage the patient to fixate wile the fixation target will wiggle to get their attention.
⦿ Once the patient looks back at the target the test will resume after a few seconds. - If the HMD continues to detect poor fixation:
⦿ The Heru Guide will run a short eye tracking calibration .
⦿ It will also track the patient's fixation using Optic Nerve Fixation Monitoring, keeping track of fixation losses as they are detected . - If the patients’ two eyes are being tested: after the first eye is done, the device will return to the resting step (step 10) and ask the patient to start the next eye by pressing the bumper when they are ready.
- Once testing is complete, the Heru Guide will congratulate the patient and instruct them to return the HMD and controller to the operator.
- The app will return to the Four Corners screen, and the device is ready to proceed with another exam, unless one chooses to quit the Heru app.
NOTE: Information about the re:Vive app can be found on the Four Corners screen by holding down the bumper for 2 seconds, and clicking the trigger 5 times.